Showing posts with label Dollhouse. Show all posts

Sunday, December 23, 2018

The Dollhouse


The dollhouse was finally finished last month. It took me fourteen months of off and on work to get it done. And it was the most exciting and enjoyable experience. It got a lot of appreciation from family, friends and strangers, which was very gratifying too. Here is the grand tour of the completed dollhouse for my blog.
This is the front of the house, which is detachable. The brick and stone detailing is all egg-carton painted and cut into form. The door and window panes are out of popsicle sticks.

 The larger plants are from craft store while I made the flowers for the window boxes out of air-dry clay. These are detachable and the girls can rearrange them according to their preference.
My father-in-law made me the awesome hinges for the door. I fashioned the lock from my jewelry making supplies.
The night view.
The right side of the house is simply wall with some windows. Same goes for the back.
The left side of the housed is more interesting with a balcony and a chimney below it, which houses the batteries for the house lights.
This is the front of the house, detached.
And its inner view.
Coming to the interior of the house, it has a living room and a kitchen on the ground floor and the bedroom and the washroom on the top floor.
The circular staircase leads up from the kitchen to the bedroom.
I probably blogged about the living room earlier, but here it is again in its completed state.
All the furnishing were made from scratch, except for the flower on the side table which is actually an eraser and has been placed by my daughter as an accent piece.
The sofa turned out just perfect but as I was just starting when I put together this living room, the curtains and wood paneling are not very finely done.
The doorway leading into the kitchen. Again the stairs are a bit crude, them too being an earlier construction.
This is one of the cutest corners of the house. The dining set is simple and sturdy and the curtains tie together the look. I added the picture frame and the clock as last-minute details.

The kitchen cabinents, sink and stove were all custom-made to fit into the available space. The shelf doors are a bit wonky (again the learning curve thing)but they do open, as do the shelves under the sink, the oven and the drawers.
There is the frigde tucked into the conrner. It was a tricky piece to make.
Moving onto the top floor, here is the balcony. This is another one of my favorite parts of the house. It has large-sliding doors which lead into the bedroom. I thought it would be cool to have the vine climbing around to the side wall from the front.
I made a lounging chair for the balcony,
...and a laundry rack. Both are made of popsicle sticks and are foldable.
Interior view from the balcony.
The bedroom still need a rug and I might crochet one some day.
The bunk bed was a requested piece and the one which made me realize just how tall the barbie dolls are. It also made me revise the house master plan and construct a dormer window, as I did not want the barbie bumping her head against the low ceiling.
The wardrobe with sliding doors was also a requested piece but it has proven to be inadequate to accommodate the barbies' expanding wardrobe. We might have to add some more storage soon.
The dressing table corner is another cute one. It leads to the bathroom.
 
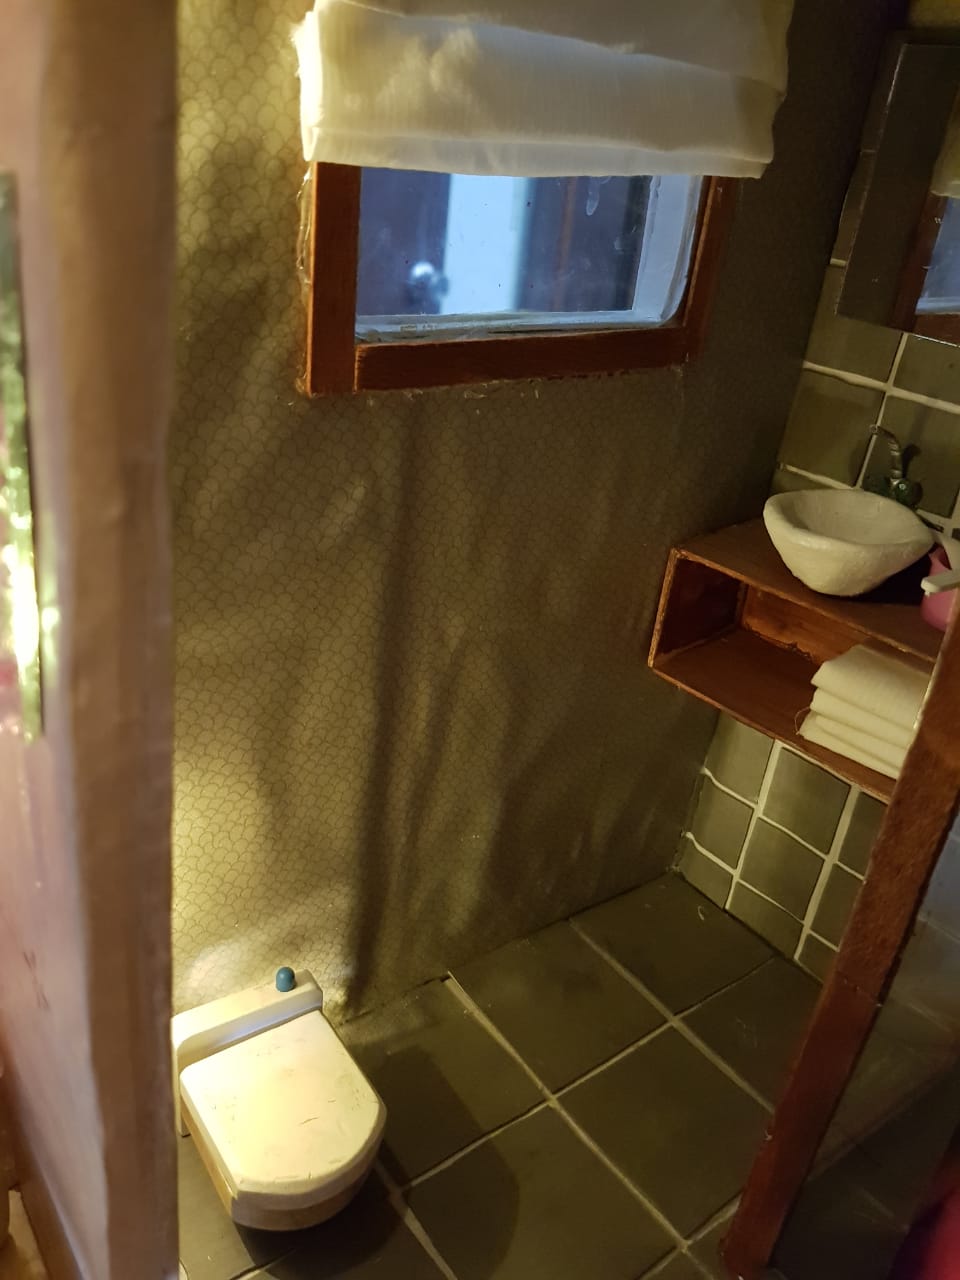
 Of course the dollhouse MUST have a fully detailed bathroom, no matter that most of it is hidden behind a curtain (which is also a MUST, a doll needs its privacy).

This concludes the very picture-intensive dollhouse tour. Hope you enjoyed it as much as I enjoyed making and sharing this project.

Monday, October 29, 2018

I'm Back

This blog has been badly ignored, almost abandoned, for the last seven months. I have nothing better in the way of excuse other than that life got in the way.  I put away my needles for the summer and all the other crafts also took a back seat to my family obligations. The next few months are also going to be busy but I hope to put up a few posts now and then.
In knitting news, I only restarted knitting last month and have knitted only two pairs of fingerless gloves.
The first one was a DROPS design that I made on comission. I always enjoy colorwork so it was a breeze. Once it was done, I wanted to knit another.
This design was reverse-engineered from an pin on pinterest. It has some embroidery too, in the form of a flower an the back of the wrist, and I add some pearl beads for good measure. I guess my eldest daughter will be claiming this pair.
  In other news, my biggest project of the year (fourteen months to be exact), the dollhouse, is nearing completion. I just need to add a few minor things and take pictures.

  Other than that, our life has been most ordinary and routine, Alhamdulillah. The weather is slowly turning milder and I feel knitting beckoning me once more. Letvus see how much I can manage in the coming months.

Monday, November 6, 2017

Dollhouse Kitchen Highlights

Kitchen was one of the most daunting part of the dollhouse, bathroom being the other. (I'm still figuring out, how to make a toilet.) What made it more challenging, was that the girls wanted it as realistic as possible. They wanted cabinets, drawers and fridge that could open and close. And, I had to made everything from scratch.

I started with this set of drawers. These were a easy start, made with matchboxes, and popsicle sticks. I used beads for drawer knobs.
Next was the sink. It was trickier but turned out OK. The sink is made from styrofoam egg carton. The cabinets underneath were hinged, though it was my first attempt and they are far from perfect. But as my husband keeps reminding me, curbing my perfectionist streak, it is just a plaything for the kids.
The range was easy and looks cute. The oven opens too. 
The hinges for these wall cabinets took some time and effort. These turned out a bit wonky, which seems to be the theme for this dollhouse. The hinges made it possible to open the doors, but keeping them closed required some thought. Velcro was my solution.
Then came the wall tiles. These brought together all the elements.
The refrigerator was my least impressive piece and hated the making of it. But girls are happy with it, and I cannot bear the thought of redoing the whole thing, so is stays. Here too, velcro came to my rescue.
The girls found some food erasers to fill it with.
Lastly, the dining set with four chairs. The red cushions go with the window curtains.

Next comes the top floor of the house. At this point in time, I am almost done with the interior of the house, and am working on the exterior. The end is almost in sight.

Friday, October 13, 2017

Dollhouse: Living Room Snippets

Continuing with the dollhouse, the first room put together was the living room. I started with a sofa, made of fabric scraps and cardboard.  It is upholstered in some leftover cotton from one of my sewing projects.
The I used the popsicles sticks to make a coffee table and a side table. These were later painted brown.
The rug took the most amount of time. It tòk me two weeks to latch-hook this thing. It used up one of the oldest yarns in my stash, but was a lot of work.
I also made some curtains. I'm not sure about them but the girls like them and my husband told me to move on.
Next I did some wall art and built a TV. (My six-year old want me to turn a cellphone into a TV so as to have one with some action.) And a table to go with it. And you can also see a clock there. I rimmed it with green crystal beads.
The wall art for the other wall.
And lastly, I made a chandelier for the room, just yesterday.
The room in its enirety will be posted in the final dollhouse post. Next post, the kitchen highlights.